Create a Mobilinkd TNC on a breadboard for just a few dollars.
The Mobilinkd TNC1 started its life, as with many things these days, as an Arduino project. It quickly took on a life of its own, first gaining Bluetooth capabilities when I discovered the latent abilities of APRSdroid. And then gaining a battery and recharging circuitry before finally ending up as a product that could be mass-produced.
Join us at https://groups.io/g/mobilinkd for questions and help on assembling this project.
But underneath it all is still the Arduino project that it started out as. With a few minor tweaks to the firmware to remove the Bluetooth and battery bits, the same firmware that runs in the Mobilinkd TNC1 will run on an Arduino.
The TNC doesn’t use Bluetooth, so you cannot use it with APRSdroid, but you can use other packet and APRS software on your computer over the Arduino’s USB serial port.
Shopping List
Here are the things you will need for this project:
- Small Breadboard (IB401 w/Jumper Wires – $5; Amazon)
- Arduino Nano v3 (Generic Arduino Nano v3.0 – $12; Amazon)
- 10KOhm Resistor (Qty 3)
- 100KOhm Resistor
- 1KOhm Resistor
- 2.2KOhm Resistor (maybe)
- 10nF Capacitor
- 100nF Capacitor
- NPN Transistor (PN2222 or equivalent)
- 3.5mm 4-pole jack (SparkFun BOB-11570 – $4)
- TNC cable for your radio (~$10; Mobilinkd)
- 3.5mm 4-pole extension cable (optional but recommended – $7; Amazon)
The resistors, capacitors and transistor cost just a few cents in total if you have them lying around. Otherwise you can find a various starter kits that include the breadboard and a set of electronic components for around $20.
You can skip the 4-pole connector and wire a cable directly into the board if you want to save yourself a few bucks.
You will also need a computer (Linux, Windows or OS X) and a mini-USB cable to load the Mobilinkd firmware onto the Arduino and to run the APRS or packet software.
Getting Started
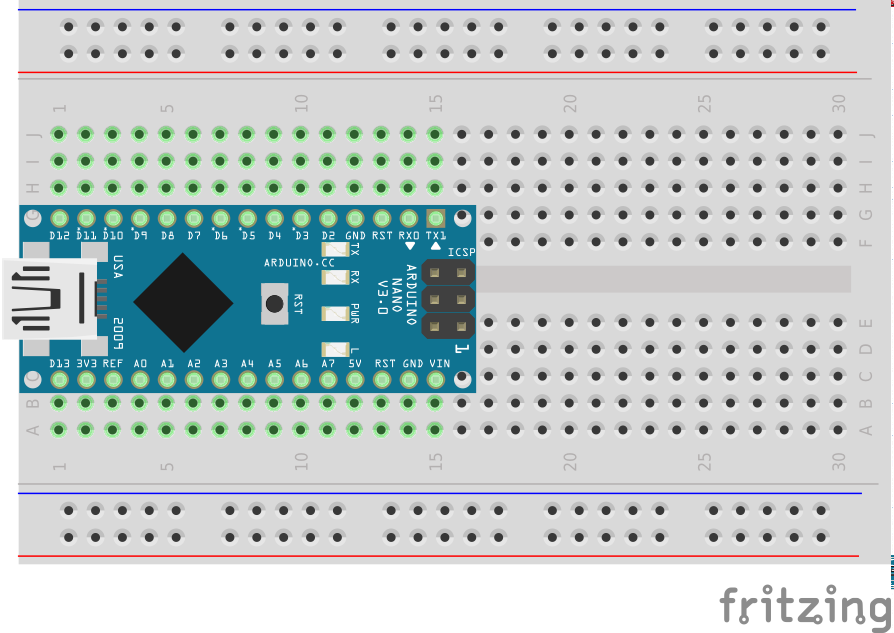
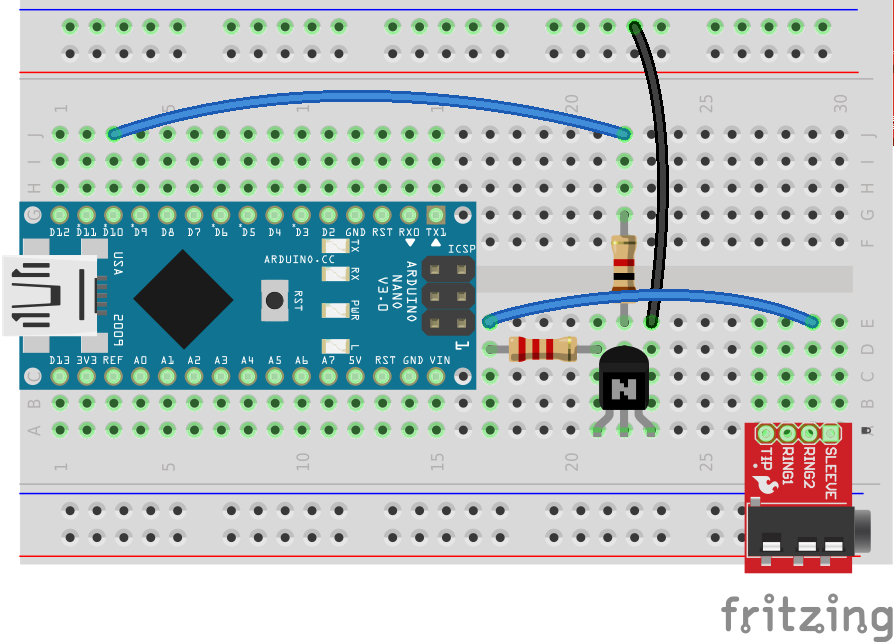
Take a look at the breadboard. The pin rows are numbered from 1 to 30. And the pin columns in the middle are labelled “a” through “j”. There are power rails along either edge. We will only be using the power rail closest to the “j” column for this project (the top two rows, red and blue, in the diagrams below.)
Arduino
Plug the Arduino Nano into one end of the board. The Arduino pins should start at row 1.
3.5mm Connector
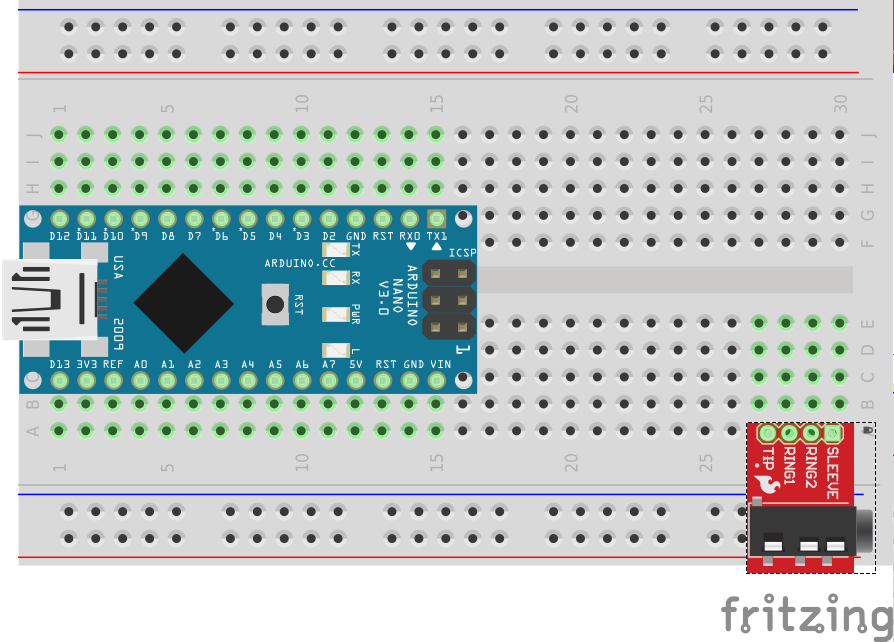
Plug the 3.5mm connector into the other end, in column “a”, pins 27-30. The SparkFun connector will facing out the rear of the breadboard.
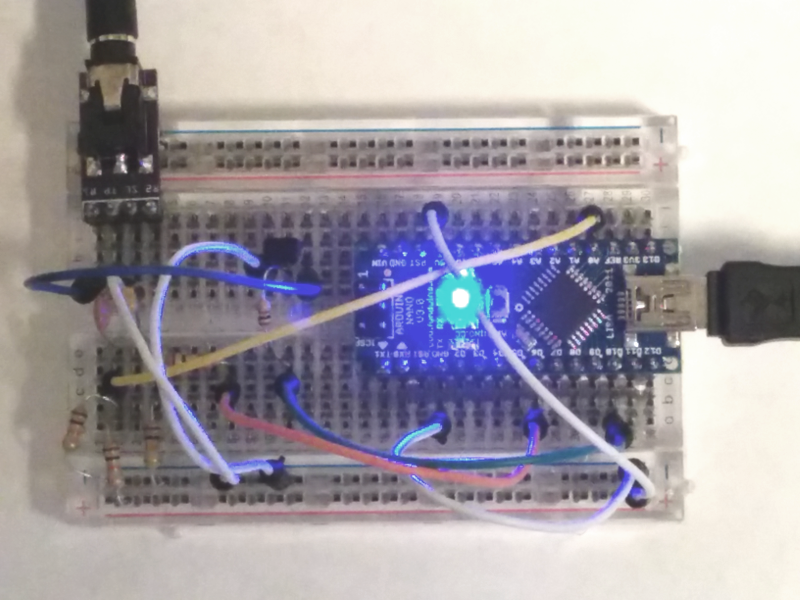
(The pinout on the SparkFun connector is different than the TRRS connector that I used in the picture at the top of this article. Some of the parts in this tutorial will be in different places on the board than what is shown there.)
(Big shout out to Rick Waldron for the BOB-11570 connector component for Fritzing.)
Just note the following:
- Sleeve is ground.
- Ring2 is audio out (TX)
- Ring1 is PTT
- Tip is audio in (RX)
PTT Circuitry
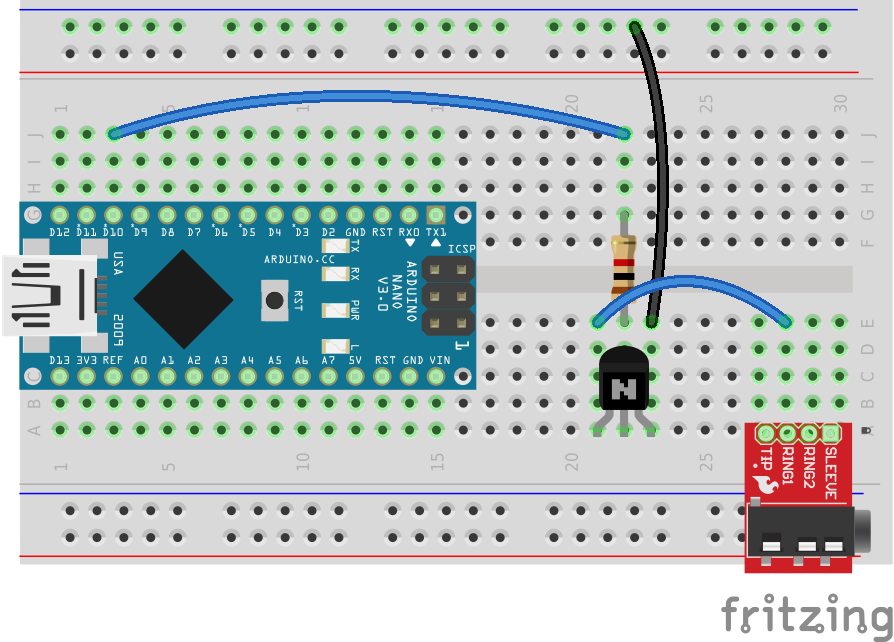
Plug the transistor into column “a”, rows 21-23. The flat part of the transistor is facing the nearest rail.
- Emitter in a:21
- Base in a:22
- Collector in a:23
Run a wire from e:23 (Collector) to the negative rail (Ground). Plug one end of the the 1KOhm resister into e:22 (Base) and the other into g:22. Run a wire from j:22 to j:3 (Arduino D10) . And then run a wire from e:21 to e:28 (3.5mm Ring 1).
PTT (Alternate)
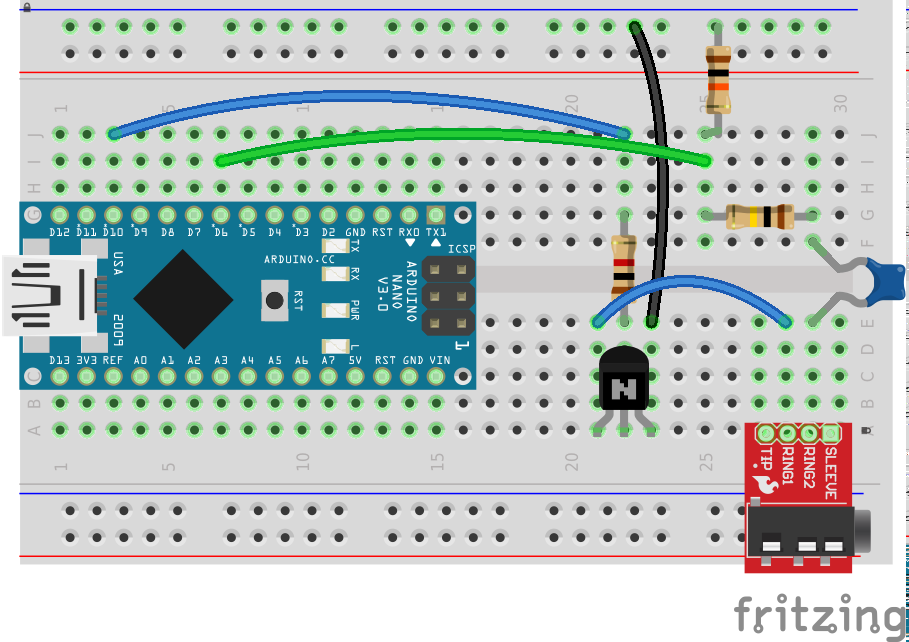
If your radio does not use a separate PTT signal, you will need one additional component. You will need 2.2KOhm resistor. Instead of a wire from e:21 to e:28, you will need to plug the 2.2KOhm resistor from d:21 to d:17, and then run the wire from e:17 to e:29. This multiplexes the PTT signal on the audio output line. If you are using this with an Icom, Yaesu or Alinco HT, this is likely what you need.
Audio Output
The TNC generates audio using PWM (pulse-width modulation). This is filtered by the radio’s audio circuitry into a nice smooth audio waveform.
Plug the 100nF capacitor into e:29 (3.5mm Ring 2) and f:29, jumping the middle of the board. Plug the 100KOhm resistor from g:29 to g:25. Connect a 10KOhm resistor from j:25 to the negative rail (Ground). Then run a wire from i:26 to i:7 (Arduino D6).
The two resistors form a voltage divider that takes the 0-5V audio output and reduces that to 0-500mV.
Audio Input
The TNC uses the ADC on the Arduino to capture the audio input, which is then decoded.
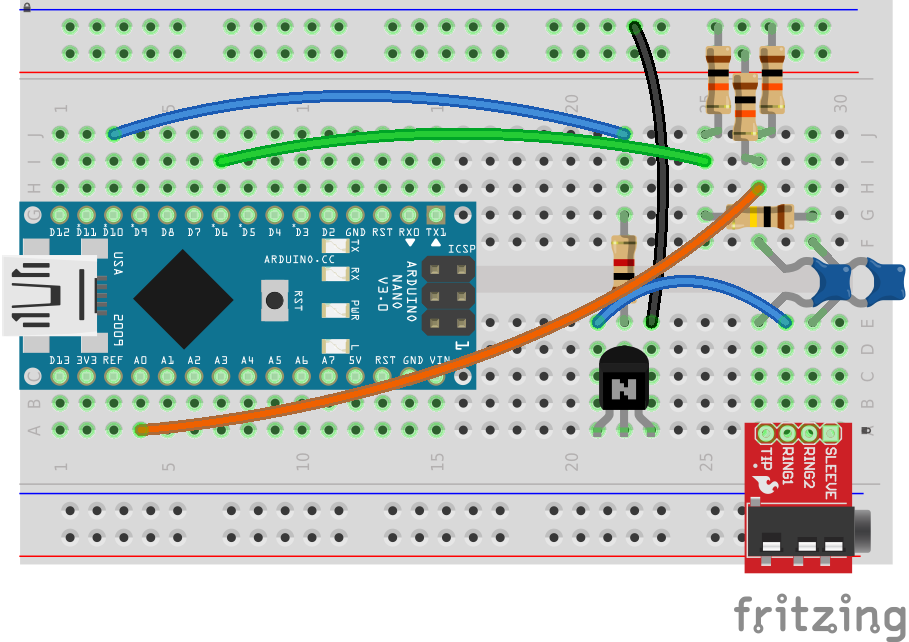
Plug the 10nF capacitor into e:27 (3.5mm Tip) and f:27, jumping the middle of the board as we did with the audio output. With the remaining two resistors, plug one into j:27 and the negative rail (Ground), and the other into i:27 and the positive rail (5V). Be careful not to short the resistors. Run a wire from h:27 to a:4 (Arduino A0).
In case you are wondering, the pair of resistors are there to add a 2.5V DC offset to the audio signal. This is needed because the audio signal comes in at about +/-1V. The ADC on the Arduino can only handle input voltages between 0-5V. With the offset, we get an audio signal that varies from 1.5-3.5V.
Power & Ground
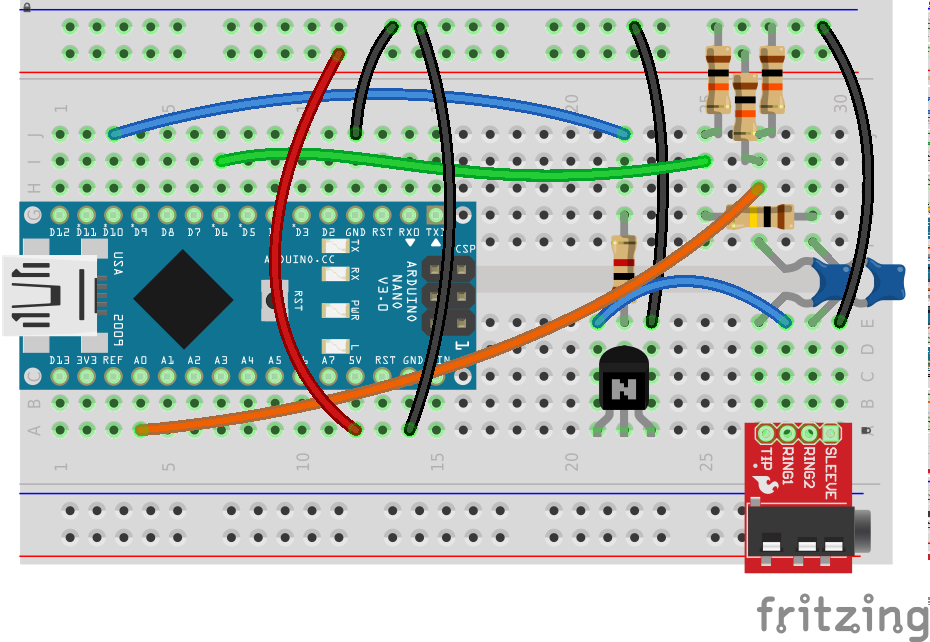
Run a wire into a:12 (Arduino 5V) into the positive rail (5V). Run a wire from i:12 (Arduino GND) to the negative rail (Ground) and from a:14 (Arduino GND) to the negative rail. It is always a good idea to tie all of the ground connectors to the ground rail. Finally, run a wire from e:30 to the negative rail. This ties the 3.5mm connector’s sleeve to ground.
Checkout
That’s it for the hardware! Go through the instructions one more time. Make sure the wiring matches and that there are no shorts (easy to do with the bare wires on the discrete components). If everything looks OK, we are ready to proceed to uploading the TNC firmware.
Firmware Installation
For this you will need a program called “avrdude” and the firmware from the Mobilinkd GitHub site. These instructions are going to assume that the firmware is being installed from a Linux host, but the process is very similar on Windows and Apple OS X. The major difference is that “avrdude” is available as an easily installed component of most Linux distributions. Getting and installing avrdude for Windows or OS X is a little more involved.
Download the firmware from the GitHub site.
https://raw.githubusercontent.com/mobilinkd/tnc1/arduino/images/mobilinkd-473-arduino.hex
You should have a file called “mobilinkd-473-arduino.hex”.
Plug the mini-USB cable from you computer to the Arduino. Find the USB serial port being used. It will typically be /dev/ttyUSB0. On my computer it is /dev/ttyUSB1 because another USB device is plugged in.
Run the following command to upload the firmware:
avrdude -c arduino -p m328p -P /dev/ttyUSB1 -b 57600 -U mobilinkd-473-arduino.hex
You should see the TX/RX LEDs flash for a bit as the firmware is uploaded, and you are done.
You now have a fully functional KISS TNC with a USB serial port. It has PTT signalling that, depending on how the circuit is configured, will work for just about any radio.
Leave the cable plugged into the TNC because this is how your computer will be communicating with the TNC.
Connect Your Radio
Before plugging in your radio, please be careful with RF around computers and in your shack. The wires on the breadboard and the leads on the components are all small antennas. It is best if you have an external antenna, keeping the RF well away from you work area. Or you can use a dummy load while testing. If you have neither of those things, please at least set your radio to low power.
Plug the extension cable into the 3.5mm jack on the breadboard. Plug your TNC cable into your radio, making sure it has a ferrite bead on it. Then plug the TNC cable into the extension cable.
Running APRS Software
The last step of the process is to run APRS software on your computer. That is a bit outside the scope of what I had intended for this article. Xastir is an easy-to-use GUI app on Linux. Just set your software to connect to a KISS TNC on the same COM port that you used when you uploaded the firmware. Set the serial port to 38400, 8N1.
If you are on Windows or Linux, you should be able to use the Mobilinkd TNC configuration programs to adjust the TX volume and monitor the RX volume, as well as set the various KISS parameters.
